
Motorhome and Campervan
User Guide
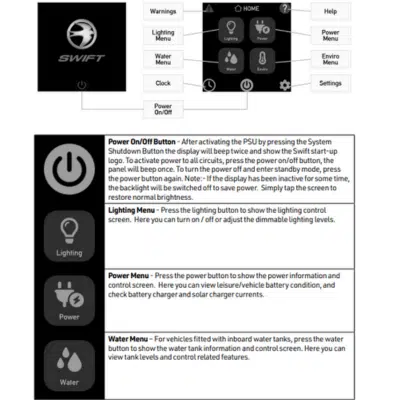
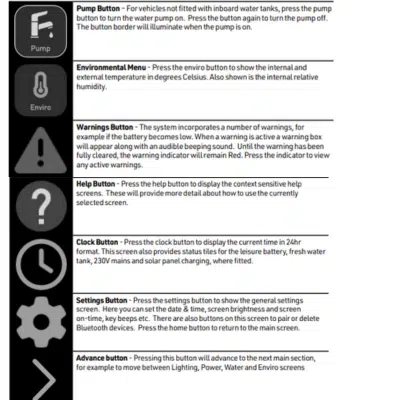
Power up your motorhome
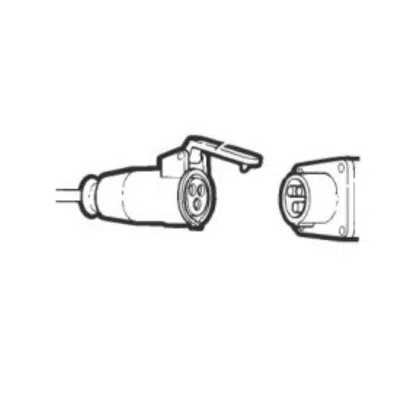
To power up your motorhome on hook up, place the orange cable on the floor and unravel it. Do not leave coiled up.
Place the end with the flap on into the motorhome 230v point located on the outside of the vehicle.
Make sure the power is turned off at the campsite end. Place the other end into the outlet at your campsite and switch on.
Once you are hooked up and power is coming into your vehicle you will be able to use the 230v plug sockets within the vehicle. The power will also charge the leisure battery for you if the solar has not.
Remember to remove the cable before moving the motorhome or campervan.
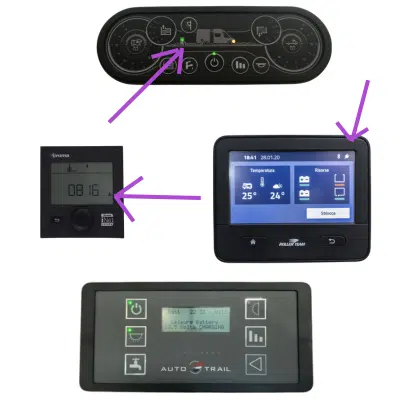
You will know you are connected to electricity when;
Swift Control Panel – The green light will come on at the point where the arrow is
Rollerteam – You will see a plug icon where the arrow is
Auto-Trail – The control panel above the door will say ‘charging’
If you have a Truma boiler on board your motorhome, you will also see a plug icon which is point out by the arrow.
Rollerteam Control Panel
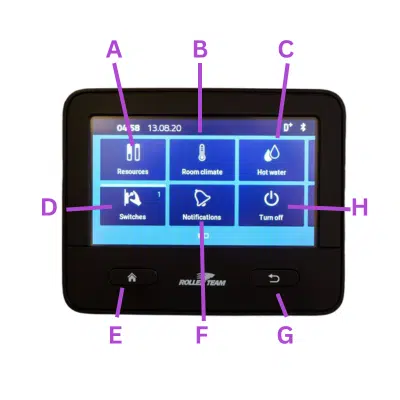
To start the panel push the home button – E
The panel will light up.
A – Click resources. This will show you your freshwater level and your waste water level. It will also show you the voltage of your cab battery and your leisure battery.
B – Room Climate is where you go to heat up your motorhome. You are able to choose here whether you use Gas or Electric or both to heat up your boiler. You can also set the room temperature. The boiler will start. You are able to turn off the heating here too.
C – Here you have the hot water button. Click here to set your hot water to 40 degrees or 60 degrees. You can power the boiler on Gas, Electric or both.
D – Switches. Here is where you will find the buttons to power your lights, your water pump and your awning light.
E – Home button
F – If there are any notifications they will appear here. Please note that if there is an error, this is where you will see the relevant code. Please see below for basic codes and how to fix the problem.
G – Back button
H – Turn off the control panel and any electric within the vehicle
Swift Control Panel
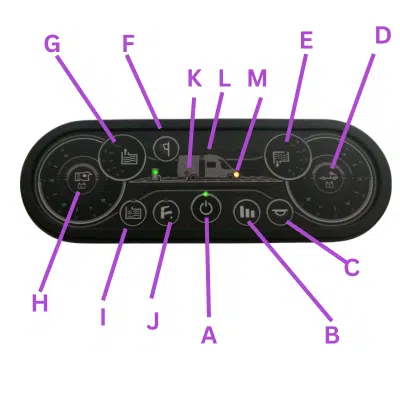
A – Turn on the power
B – This will show your levels of freshwater (G), Waste Water (E), Leisure Battery (H) and Cab Battery (D)
C – This will turn on the interior lights
F – This will turn on the exterior light
I – Not for use during summer. This is used to prevent the water from freezing in the water tank during extremely cold temperatures.
J – This is your water pump switch
K – This will light up when you are drawing power from your leisure battery
L – This will light up when you have your exterior light on
M – This shows you are drawing 12v power from your cab battery.
Swift Trekker Control Panel
Auto-Trail Control Panel
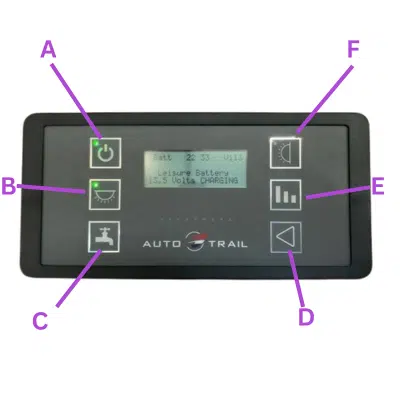
A – Power Button – Press the power button to turn the leisure power on. Press the button again to turn the power off. The adjacent LED will illuminate when the power is on, and also the voltage of the selected battery will be displayed on the screen. When the vehicle engine is running this LED will flash to indicate the leisure battery is being charged.
B – Light Button – With the power on, press the light button to turn a selection of internal lights on. Press the button again to turn these lights off. The adjacent LED will illuminate when the lights are on. The lights will be turned on and off automatically each time the power button is operated.
C – Pump Button- with the power on, press the pump button to turn the water pump on. Press the button again to turn the pump off. The adjacent LED will illuminate when the pump is on, and also the level of the water tank will be displayed on the screen.
D – Select Button – Use this button to select options/items or to change settings.
E – Levels/Scroll Button – Use this button to scroll through the various levels screens / menu items or to cancel alarms / warnings. Note: The screen illumination / backlight will turn off after a period of time. Press the levels button to reactivate the illumination.
F – Exterior Light Button (if equipped) – With the power on, press the awning light button to turn the awning light on or off. The adjacent LED will illuminate when the light is on.
Water
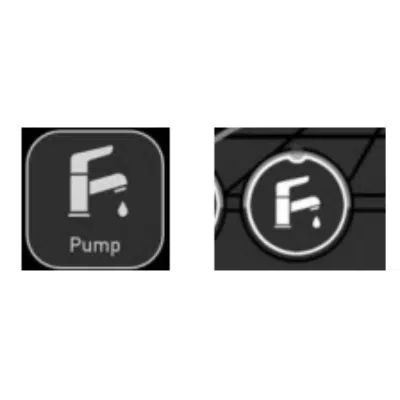
You will likely see this button on all of the control panels.
This powers the water supply. You must have your freshwater tank at least 25% full before pushing this button for the first time. The water pump will activate when pushed.
You will likely here a pump noise from somewhere in the vehicle. The pump will purge the water heater / boiler first then supply water to the rest of the vehicle.
You water pump will power the kitchen sink, bathroom shower and sink and the toilet water.
YOU MUST TURN OFF THE WATER PUMP WHEN NOT IN USE OR LEAVING THE MOTORHOME / CAMPERVAN.
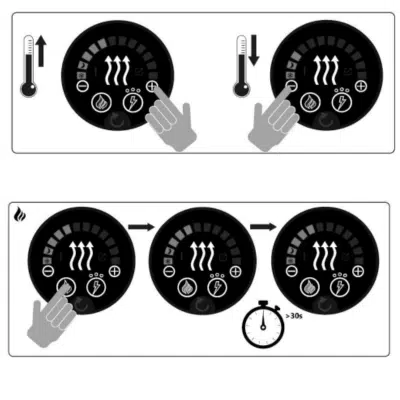
Truma Combi Boiler
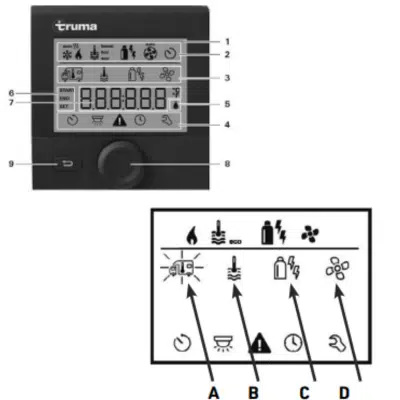
Turn heating system ON: Press and hold the rotary control (8) for 3 seconds to turn the system ON – the display will alternate between time and temperature displays. Press the rotary control (8) to adjust settings – the display will then show the symbols row (3).
Pressing and holding the rotary control (8) will also switch the heating system OFF.
Choose required room temperature:
Rotate the control (8) until the vehicle symbol (A) is flashing, then press the rotary control (8) to allow adjustment of room temperature. Rotate the control (8) to select the preferred room temperature, or rotate anti-clockwise to ‘OFF’ if room heating is not required. Press the rotary control (8) to confirm this selection.
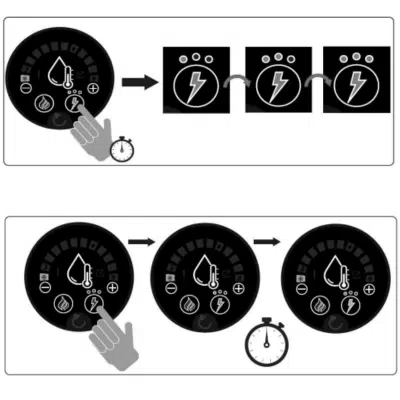
Choose water heating settings:
Rotate the control (8) until the thermometer symbol (B) is flashing, then press the rotary control (8) to allow adjustment of water heating settings.
Turn the rotary control (8) to select either Eco, Hot or Boost, or rotate anti-clockwise to ‘OFF’ if room heating is the priority, and water heating is not important. Press the rotary control to confirm the selection.
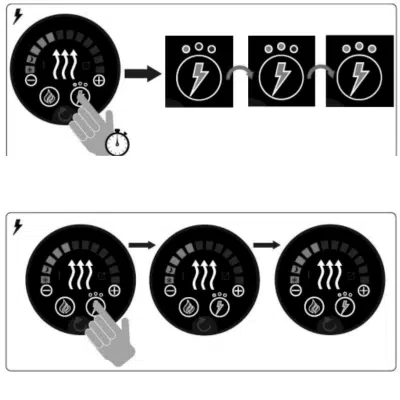
Choose energy source:
Turn the rotary control (8) until the energy symbol (C) is flashing, then press the rotary control (8) to allow the adjustment of energy selection.
Turn the rotary control (8) to select one of the available choices, then press the rotary control to confirm.
Choices are:
GAS (gas only)
EL1 (0.9kw electric element)
EL2 (1.8kw electric element)
MIX 1 (Gas + 0.9kw electric element)
MIX 2 (Gas + 1.8kw electric element)
Choose fan settings:
Turn the rotary control (8) until the fan symbol (D) is flashing, then press the rotary control (8) to allow the adjustment of fan settings. Turn the rotary
control (8) to choose from one of the available options, then press the rotary control (8) to confirm.
Choices are:
OFF – No fan operation required. Only possible when no room temperature is selected.
Vent – Fan operates to circulate cold air only. Only possible when appliance is cold (No water or space heating)
Eco/High – Fan limited to either low (Eco) or high speed. Actual fan speed will vary according to heating system requirements.
Boost – Maximum fan operation. Only possible when there is a large difference between room temperature and preferred room temperature.
Whale Heating
Locate the heater control which is usually above the habitation door.
Press the ‘+’ and ‘-‘ buttons on the controller to choose the desired temperature, as shown by the gauge
which runs around the upper perimeter of the control
To operate on gas:
Press the ‘flame’ button on the control once. After approx. 30 seconds, the colour of the ‘flame’ button will change from Blue to Orange, to show that gas heating is in operation
Whale Heating - Continued
Electric Operation (Only available when a mains hook up is connected)
Press and hold the ‘lightening’ button on the controller to cycle through 0.75kW heating (One LED illuminated above button), 1.5kW (two LED’s illuminated above button), and 3.0kW (three LED’s illuminated above button) settings. Let go of the button when the desired setting is selected.
A single press of the ‘lightening’ button with turn electric heating ON and OFF. When the button changes from Blue to Orange illumination, this confirms that electric heating is operational.
Whale Water Heater
Locate the water heater control which is usually next to the heating control.
To change the temperature of the water – Press the ‘+’ and ‘-‘ buttons on the controller to choose the desired temperature, as shown by the gauge which runs around the upper perimeter of the control.
To power the waster heater on gas, Press the ‘flame’ button on the control once. After approx. 30 seconds, the colour of the ‘flame’ button will change from Blue to Orange, to show that gas water heating is in operation.
Whale Water Heater - Continued
Electric Operation (Only available when a mains hook up is connected)
Press and hold the ‘lightening’ button on the controller to cycle through 0.38kW heating (One LED illuminated above button), 0.75kW (two LED’s illuminated above button), and 1.5kW (three LED’s illuminated above button) settings. Let go of the button when the desired setting is selected.
A single press of the ‘lightening’ button with turn electric water heating ON and OFF. When the button changes from Blue to Orange illumination, this confirms that electric heating is operational.
Using the toilet
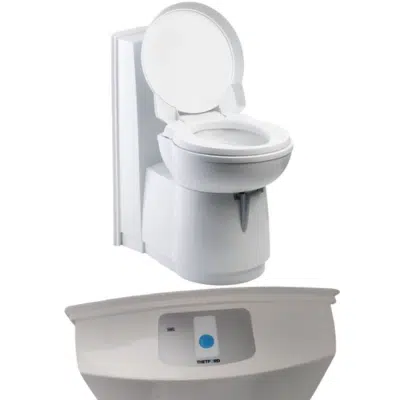
1 – Ensure vent to cassette is open when in use, and closed at all other times. This is controlled by the grey lever on the side of the toilet.
2 – The seat swivels if required, and the water pump needs to be turned on from the control panel for the flush to function.
3 – The green light behind the toilet will turn orange/red when the cassette is full
4 – The flush will be located on top of the toilet or on the wall behind it. You should close the lid to flush the toilet.
Toilet Cassette
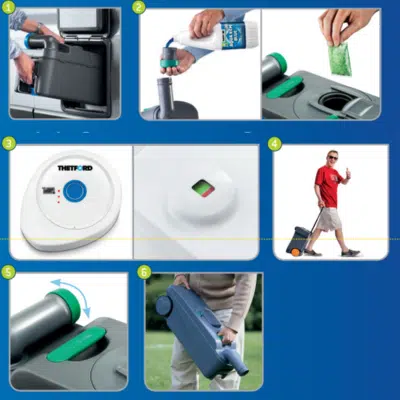
1 – Open the service door on the outside of your vehicle and remove the waste-holding tank.
2 – Add the correct dosage of water toilet chemicals.
3 – Look at the level indicator if the tank needs to be emptied.
4 – Just move the waste-holding tank by the wheels and handle to the special dump station on the campsite.
5 – Turn the pour out spout and remove the cap.
6 – Press and hold the vent button with your thumb while the pour out spout is pointing downwards. Empty the waste-holding tank.